This document provides instructions for installing Protein Prospector manually on a LINUX server. You will need to download some files from our download server which can be obtained by emailing us for a link. Protein Prospector is available free for Universities and Non-Profits. There are 3 levels of installation. First there is the Basic version that has the basic database search programs such as MS-Fit, MS-Tag, etc and the peptide/protein MS Utility programs like MS-Digest and MS-Product, etc. The Full version adds the Batch MSMS Database Searching capability with associated programs. The Raw Data Package allows you to do quantitation and single spectrum display by accessing Thermo .raw files. You can do the installation incrementally adding capabilities as you progress.
The Firefox web browser is recommended when using Protein Prospector.
It is also possible to run the Protein Prospector programs from the command line. Eg as part of another pipeline or on a cluster. Those facilities are not described here.
- Basic or Full Version
- Install Required Packages
- Create the Installation
- Test the Binaries
- Configure Apache
- Install the FASTA Databases
- Testing R and Perl
- Install and Configure mySQL/Maria-DB
- Configure MPI
- Define the Repository Directories
- Define the Data Directories
- Install Batch-Tag Daemon
- Other Installation Topics
- LINUX Administration Tasks
- Swap Files
- Deleting Files with Strange Names
- Setting the Sticky Bit
- Checking Which Version Of Debian You Are Running
- Showing Unmounted Drives
- Mounting Drives
- Auto-Mounting Drives At Boot
- Time Since Last Reboot
- Using curl To Download UniProt Databases
- Changing Permissions For Files in the params Directory
- Add an SSH-Enabled User
- The Colour Code for File Types in LINUX Directory Listings
- Starting Services at Boot Time
- Getting a List of Spectra Searched from a Prospector Batch-Tag XML Results file
- Logging into a Server Via a Jump Server
- Copying a File Via a Jump Server
A list of the potential downloads is given below. These assume installation on Ubuntu 22. We have also previously installed Protein Prospector on CentOS, openSUSE and Debian.
- BASIC version
- Prospector BASIC distribution: prospector..basic_ubuntu_22.tar.gz - if you only ever want the BASIC version
- FULL version
- Prospector FULL distribution: prospector..fullmpi_ubuntu_22.tar.gz
- BASIC and FULL version
- Indexed SwissProt FASTA database: seqdb.2022.05.26.tar.gz
- Example file to test Perl: msms2.txt
- FULL version
- Batch-Tag mySQL database initialization script: prospector.sql
- Peak list to test Batch-Tag: F1.mgf
- Raw Daemon package
- LINUX version of the Raw Data Daemon: rd.tar.gz
- Data set to test the Raw Daemon: T20100722-33_ITMSms2cid.zip
First download the Protein Prospector tar.gz file. If you only ever intend to install the BASIC version then download the file prospector..basic_ubuntu_22.tar.gz. If you intend to eventually install the FULL version then download the file prospector..fullmpi_ubuntu_22.tar.gz.
The next step is to decide where you want to install Protein Prospector. If you are just installing the BASIC version then the root partition may be OK. Generally however it is probably best to make use of an additional hard drive. Protein Prospector makes use of some directory structures that can get very large. These can easily be relocated. The main directory structures are:
- BASIC and FULL version
- Protein sequence databases (optional but almost always used)
- MS-Viewer repository (optional)
- FULL version
- User repository (necessary)
- Laboratory data repository (optional)
These instructions assume the package will be installed in /var/lib/prospector and that the additional drive is /mnt.
Install the following packages if not already installed. These packages are required for both the BASIC and FULL versions.
sudo apt-get -y install p7zip-full
sudo apt-get -y install unrar-free
sudo apt-get -y install ghostscript
sudo apt-get -y install r-base
sudo apt-get -y install apache2
sudo cpan install XML::Simple
Answer yes to all questions.
Note that this also installs make which is required if you need to compile the Protein Prospector source code.
If you downloaded the FULL version then install the following additional packages.
sudo apt-get install mariadb-server
sudo apt-get -y install openmpi-bin
It is possible to use the FULL version without installing MPI, but then the Batch-Tag searches will be a lot slower.
Enter the following commands:
cd /var/lib
sudo mkdir prospector
sudo chown www-data:www-data prospector
cd prospector
Copy the archive (prospector..basic_ubuntu_22.tar.gz or prospector..fullmpi_ubuntu_22.tar.gz) into this prospector directory.
sudo gunzip prospector..basic_ubuntu_22.tar.gz sudo tar xvf prospector..basic_ubuntu_22.tar sudo rm prospector..basic_ubuntu_22.tar sudo chown -R www-data:www-data web
The next step tests if the compiled prospector binaries are OK for your system.
cd /var/lib/prospector/web/cgi-bin
./mssearch.cgi -f ../params/msisotope/default.json
The output should be the HTML code to produce MS-Isotope web page.
If this doesn't work then contact us via the support email: .
You may need to obtain the Protein Prospector source code and compile it.
The following instructions are for installing a HTTP server. It is also possible to install Protein Prospector on a HTTPS server but we don't have instructions for that as yet.
Create a file called prospector.conf with the following contents in the directory /etc/apache2/sites-available.
   AddHandler cgi-script .cgi
   AddHandler cgi-script .pl

   DirectoryIndex index.html
   ScriptAlias /prospector/cgi-bin /var/lib/prospector/web/cgi-bin
   Alias /prospector /var/lib/prospector/web

   <Directory "/var/lib/prospector/web">
      Options FollowSymLinks
      DirectoryIndex index.html
      AllowOverride None
      Require all granted
   </Directory>
Run the following command.
sudo ln -s /etc/apache2/sites-available/prospector.conf /etc/apache2/sites-enabled/prospector.conf
In: conf-available/serve-cgi-bin.conf add:
       <IfDefine ENABLE_USR_LIB_CGI_BIN>
                ScriptAlias /cgi-bin/ /var/lib/prospector/web/cgi-bin/
                <Directory "/var/lib/prospector/web/cgi-bin">
                        AllowOverride None
                        Options +ExecCGI -MultiViews +SymLinksIfOwnerMatch
                        Require all granted
                </Directory>
        </IfDefine>
Fix apache using the following commands.
sudo rm /etc/apache2/mods-enabled/deflate.*
sudo ln -s /etc/apache2/mods-available/proxy.conf   /etc/apache2/mods-enabled/proxy.conf
sudo ln -s /etc/apache2/mods-available/proxy.load   /etc/apache2/mods-enabled/proxy.load
sudo ln -s /etc/apache2/mods-available/proxy_http.load   /etc/apache2/mods-enabled/proxy_http.load
sudo ln -s /etc/apache2/mods-available/rewrite.load /etc/apache2/mods-enabled/rewrite.load
sudo ln -s /etc/apache2/mods-available/cgid.conf   /etc/apache2/mods-enabled/cgid.conf
sudo ln -s /etc/apache2/mods-available/cgid.load   /etc/apache2/mods-enabled/cgid.load
Two other things that you might want to adjust either now or at some point in the future are the Apache timeout and the maximum upload file size. These are specified via the TimeOut and LimitRequestBody specifiers. TimeOut is specified in seconds (default 60) and LimitRequestBody in bytes (default 1073741824). They can be specified at the end of the /etc/apache2/apache2.conf file. You need to restart Apache for them to come into effect. If you want bypass these checks you would add these lines.
TimeOut 0
LimitRequestBody 0
You might need a large (or unbounded) limit for the file size if you want to use Batch-Tag Web for large peak lists or with raw data files. Also if you want to move Batch-Tag projects between servers using the Results Management program. MS-Viewer also sometimes needs to upload very large files such as MaxQuant results sets.
If you are interacting with the server and it is giving you feedback on the progress of a search then the timeout is reset every time it prints a message. However there are cases when the default value is insufficient.
Start Apache again.
sudo /etc/init.d/apache2 restart
At this point you should be able to run MS-Isotope from a web browser.
The web address from the installation machine (if you have Firefox or whatever installed on that) would be:
http://localhost/prospector/mshome.htm
If you are just using the installation machine as a server then you will need its web address. Eg:
http://myserver.com/prospector/mshome.htm
Don't try to run any other programs at present.
Download the current seqdb archive. Currently this is seqdb.2022.05.26.tar.gz.
cd /var/lib/prospector
sudo mkdir seqdb
sudo chown www-data:www-data seqdb
cd seqdb
Copy the archive into this seqdb directory.
sudo cp seqdb.2022.05.26.tar.gz /var/lib/prospector/seqdb
cd /var/lib/prospector/seqdb
sudo gunzip seqdb.2022.05.26.tar.gz
sudo tar xvf seqdb.2022.05.26.tar
sudo rm seqdb.2022.05.26.tar
sudo chown www-data:www-data S*
You might want to put the seqdb directory on a larger partition.
Let's say your second partition is /mnt
Then create a directory /mnt/prospector with ownership www-data:www-data
Then move the seqdb directory so it is /mnt/prospector/seqdb (it needs to have ownership www-data:www-data)
The position of the seqdb directory is defined in the file /var/lib/prospector/web/params/info.txt (edit this with a text editor).
Near the top of the file is a line that needs to be:
seqdb /mnt/prospector/seqdb
or whatever the directory is.
Now try to run MS-Fit or MS-Tag from the web interface choosing Swiss-Prot as the database.
To test R run the default MS-Tag page.
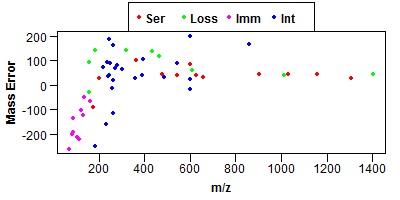
Click on one of the peptides in the results and it should bring up an MS-Product page. If it is working the MS-Product page should show a mass error graph like the one shown below.
To test Perl bring up the MS-Viewer home page.
Set Results File Format to MaxQuant
Under the Results File option there's a Browse button. Select the example msms2.txt file
Press Upload New Results.
You should get a 3 line MaxQuant report. There will be no links as there is no peak list file. However it will test Perl is working.
The installation of the BASIC version is now complete.
Obtain the initialisation script prospector.sql
sudo apt-get install mariadb-server
sudo su
/etc/init.d/mariadb start
mysql -u root < prospector.sql
mysql -u root
MariaDB [(none)]> GRANT ALL ON ppsd.* TO prospector IDENTIFIED BY 'pp';
MariaDB [(none)]> quit
exit
Note that the password (here pp) should match the one in /usr/lib/prospector/web/params/info.txt
Batch-Tag uses the MPI package to enable multi-process searches. On a LINUX system the Perl script mssearchmpi.pl in the web/cgi-bin directory is called by the Batch-Tag Daemon to initiate searches. The script attempts to detect the type of LINUX and the MPI package that is installed. Older versions used MPICH2 so the script tries to figure out whether openMPI is installed. If it can't find it it assumes MPICH2 is in use.
The number of cores used for a Batch-Tag job is controlled by the line:
my $num_processors = 8; ##### this is where you set the number of cores used by MPI
in the script. You can modify this line if you want to use more cores for a search to make the searches run faster. Note that the number of processes used when a search starts is one greater as the is a coordinating process which doesn't use much in the way of resources.
A repository is necessary to store uploaded data files, project files and results files for Batch-Tag searches. The data repository needs to be on a partition with sufficient space for your future needs. Each user on the system is allocated a separate directory in the repository. Below it is assumed that the data repository is in /mnt/repository.
cd /mnt
sudo mkdir repository
sudo chown www-data:www-data repository
cd /mnt/repository
sudo mkdir temp
sudo chown www-data:www-data temp
Edit info.txt.
cd /var/lib/prospector/web/params
sudo vi info.txt
Edit the repository directives to:
upload_temp /mnt/repository/temp
user_repository /mnt/repository
This section applies if you want a data repository. This is optional. A data repository allows you to arrange your data in convenient directories as you acquire it (say by instrument and date). This data is then available to all users on the system and is not stored in the user directories. You can search data from the data repository directly with Batch-Tag rather than uploading it with Batch-Tag Web. Using a data repository is much more convenient if you want to extensively use the raw data package as the raw data files can get very large making it inconvenient to upload them to the server. Individual users can still upload data to the system which will be then stored in their user directory rather than the data repository. The data repository needs to be on a partition with sufficient space for your future needs. Below it is assumed that the data repository is in /mnt/data.
There's some documentation on how to set up a data repository here. At this point it is just necessary to specify the top level directories.
Create the directories.
cd /mnt
sudo mkdir data
sudo chown www-data:www-data data
cd /mnt/data
sudo mkdir peaklists
sudo mkdir raw
sudo chown www-data:www-data peaklists
sudo chown www-data:www-data raw
Edit info.txt.
cd /var/lib/prospector/web/params
sudo vi info.txt
Edit the data directives to:
centroid_dir /mnt/data/peaklists
raw_dir /mnt/data/raw
The Batch-Tag Daemon can be started with the following command:
sudo -u www-data /var/lib/prospector/web/cgi-bin/btag-daemon run /var/lib/prospector/web/cgi-bin&
The Batch-Tag Daemon can be stopped using the kill command. First find out the process ID by running the command:
ps -ef | grep btag-daemon
The output will be something like the following without the first line which is the column headings.
UID        PID  PPID  C STIME TTY          TIME CMD
root      7166  7138  0 07:58 pts/0    00:00:00 sudo -u www-data /var/lib/prospector/web/cgi-bin/btag-daemon run /var/lib/prospector/web/cgi-bin
www-data  7167  7166  0 07:58 pts/0    00:00:00 /var/lib/prospector/web/cgi-bin/btag-daemon run /var/lib/prospector/web/cgi-bin
peter     7173  7138  0 07:58 pts/0    00:00:00 grep btag-daemon
In this case the process ID (or PID) is 7166. So the command to kill the btag-daemon would be:
sudo kill 7166
You can check the kill command has worked by entering the ps command above again. The output should just show the grep command.
If the btag-daemon process is still showing you can use the following command:
sudo kill -9 7166
In the first case the kill command sent the termination signal (SIGTERM - numeric 15) to the daemon. This allows the daemon to perform its shutdown procedures such as deleting files from any partially finished jobs. In the second case the kill command sent the kill signal (SIGKILL - numeric 9) to the daemon. This will kill the process without performing cleanup operations.
It is possible to get the Batch-Tag Daemon to start automatically by setting it up to run as a service. Make sure the Batch-Tag Daemon isn't running before you do this.
Enter the following commands to create an empty service file with the correct permissions:
cd /etc/systemd/system
sudo touch /etc/systemd/system/btag-daemon.service
sudo chmod 664 /etc/systemd/system/btag-daemon.service
Next edit the btag-daemon.service file and enter the following contents:
[Unit]
Description=Batch-Tag Daemon
After=network.target mysqld.service
Requires=network.target mysqld.service

[Service]
ExecStart=/var/lib/prospector/web/cgi-bin/btag-daemon run /var/lib/prospector/web/cgi-bin
User=www-data
Group=www-data

[Install]
WantedBy=multi-user.target
Next reload the systemd configuration:
sudo systemctl daemon-reload
At this point you can start, stop and restart the Batch-Tag Daemon service using the systemctl command. Ie:
sudo systemctl start btag-daemon
sudo systemctl stop btag-daemon
sudo systemctl restart btag-daemon
The following command will start the service when booting the server:
sudo systemctl enable btag-daemon
You can disable starting the service when booting the server via the command:
sudo systemctl disable btag-daemon
If you need to compile the Prospector source code do the following.
Install the compiler.
sudo apt-get -y install gcc
sudo apt-get -y install g++
Install zlib with its development support files.
sudo apt-get -y install zlib1g-dev
If you want to compile the Full version also install openMPI and MariaDB with their development support files.
sudo apt-get -y install libopenmpi-dev
sudo apt-get install -y libmariadb-dev
Obtain the source code (pp.tar.gz).
Unpack the Prospector source code into your home directory.
gunzip pp.tar.gz tar xvf pp.tar
Compile the Prospector source code. For the Basic version.
cd pp make allbasic
For the Full version.
cd pp make all
At the end of the make the binaries will be in pp/bin
If you need to make it again run:
make clean
before
make all
or
make allbasic
There is a separate make procedure for making the Raw Daemon binary (raw-daemon).
make clean
make rd
If you have previously compiled the code in your home directory you can copy the binaries that you made into the Prospector binary directory web/cgi-bin.
cd /var/lib/prospector/web/cgi-bin sudo cp ~/pp/bin/* .
1. Install Packages
Run the following commands.
sudo apt install gnupg ca-certificates
sudo apt-key adv --keyserver hkp://keyserver.ubuntu.com:80 --recv-keys 3FA7E0328081BFF6A14DA29AA6A19B38D3D831EF
echo "deb https://download.mono-project.com/repo/ubuntu stable-focal main" | sudo tee /etc/apt/sources.list.d/mono-official-stable.list
sudo apt update
Note that stable-focal corresponds to Ubuntu 20.04. However this has been found to work for Ubuntu 22.
Next install mono.
sudo apt-get install mono-complete
Information on other LINUX distributions is available at the following links:
UbuntuDebian
Raspbian
CentOS/RHEL
Fedora
2. Download and Install Raw Daemon
Download the file rd.tar.gz.
The files required by the LINUX version of the Raw Daemon contained in the download file rd.tar.gz are:
raw-daemon
batchRD.exe
ThermoFisher.CommonCore.BackgroundSubtraction.dll
ThermoFisher.CommonCore.Data.dll
ThermoFisher.CommonCore.RawFileReader.dll
raw_daemon.txt
rdd.log
raw-daemon is the binary for the daemon process.
batchRD.exe is a compiled c# program which does the actual jobs. It can be compiled from the source code (you don't need to do this) by using the following command:
mcs -lib:ext/thermo_fisher -out:batchRD.exe -r:ThermoFisher.CommonCore.RawFileReader.dll,ThermoFisher.CommonCore.Data.dll batchRD.cs
ThermoFisher.CommonCore.BackgroundSubtraction.dll, ThermoFisher.CommonCore.Data.dll, ThermoFisher.CommonCore.RawFileReader.dll are libraries used by batchRD.exe.
raw_daemon.txt is a file for specifying parameters such as directories
rdd.log is log file created by the raw-daemon. You can sometime diagnose errors by looking in this file.
Extract and copy the 7 files to the web/cgi-bin directory:
gunzip rd.tar.gz
sudo -u www-data tar xvf rd.tar /var/lib/prospector/web/cgi-bin
3. Configuring the Raw Daemon
Next you need to set up the parameters in the raw_daemon.txt file. The parameter section of a typical raw_daemon.txt file is shown below.
daemon_loop_time 1
max_searches 1
shared_dir /mnt/repository/temp
raw_dir /mnt/data/raw
user_repository /mnt/repository
daemon_loop_time is the gap in seconds that the daemon waits between checking for new jobs
max_searches is the maximum number of concurrent quantitation jobs, subsequent jobs will be queued
shared_dir is the interchange directory (see below) between the Daemon and the Protein Prospector installation
user_repository is the root directory of the Protein Prospector user repository
raw_dir is the root directory of the Protein Prospector data repository if one is present
multi_process should be set to false as this feature hasn't been fully implemented yet
Look for your user repository folder which is specified by the user_repository directive in the web/params/info.txt file. This is what needs to be specified by the user_repository directive in the raw_daemon.txt file. It should have been created when you tested the Batch-Tag operation as detailed above.
You will need to create the directory specified by the shared_dir directive. In the above example this is assumed to be /mnt/repository/temp. Inside the directory specified by shared_dir you also need to create 2 additional directories called rawFetch and searchCompare. The shared_dir directive should match the upload_temp directive in the file web\params\info.txt.
cd /mnt/repository/temp
sudo mkdir rawFetch
sudo mkdir searchCompare
sudo chown www-data:www-data rawFetch
sudo chown www-data:www-data searchCompare
In the above example this would leave us with the directories:
/mnt/repository/temp/rawFetch
and
/mnt/repository/temp/searchCompare
Single spectrum display jobs are written to the rawFetch directory and get dealt with immediately. Quantitation jobs get written to the searchCompare directory and are batch processed.
If you have created a laboratory data repository then the raw_dir directive needs to correspond with what's specified as raw_dir in the web\params\info.txt file.
4. Starting And Stopping The Raw DaemonThe Raw Daemon can be started with the following command:
sudo -u www-data /var/lib/prospector/web/cgi-bin/raw-daemon run /var/lib/prospector/web/cgi-bin&
The Raw Daemon can be stopped using the kill command. First find out the process ID by running the command:
ps -ef | grep raw-daemon
The output will be something like the following without the first line which is the column headings.
UID        PID  PPID  C STIME TTY          TIME CMD
root      5853  5587  0 01:44 pts/0    00:00:00 sudo -u www-data /var/lib/prospector/web/cgi-bin/raw-daemon run /var/lib/prospector/web/cgi-bin
www-data  5854  5853  0 01:44 pts/0    00:00:00 /var/lib/prospector/web/cgi-bin/raw-daemon run /var/lib/prospector/web/cgi-bin
peter     5862  5587  0 01:45 pts/0    00:00:00 grep raw-daemon
In this case the process ID (or PID) is 5853. So the command to kill the raw-daemon would be:
sudo kill 5853
You can check the kill command has worked by entering the ps command above again. The output should just show the grep command.
If the raw-daemon process is still showing you can use the following command:
sudo kill -9 5853
In the first case the kill command sent the termination signal (SIGTERM - numeric 15) to the daemon. This allows the daemon to perform its shutdown procedures such as deleting files from any partially finished jobs. In the second case the kill command sent the kill signal (SIGKILL - numeric 9) to the daemon. This will kill the process without performing cleanup operations.
5. Setting Up The Raw Daemon To Autostart On BootIt is possible to get the Raw Daemon to start automatically by setting it up to run as a service. Make sure the Raw Daemon isn't running before you do this.
Enter the following commands to create an empty service file with the correct permissions:
cd /etc/systemd/system
sudo touch /etc/systemd/system/raw-daemon.service
sudo chmod 664 /etc/systemd/system/raw-daemon.service
Next edit the raw-daemon.service file and enter the following contents:
[Unit]
Description=Protein Prospector Raw Daemon

[Service]
ExecStart=/var/lib/prospector/web/cgi-bin/raw-daemon run /var/lib/prospector/web/cgi-bin
User=www-data
Group=www-data

[Install]
WantedBy=multi-user.target
Next reload the systemd configuration:
sudo systemctl daemon-reload
At this point you can start, stop and restart the Raw Daemon service using the systemctl command. Ie:
sudo systemctl start raw-daemon
sudo systemctl stop raw-daemon
sudo systemctl restart raw-daemon
The following command will start the service when booting the server:
sudo systemctl enable raw-daemon
You can disable starting the service when booting the server via the command:
sudo systemctl disable raw-daemon6. Testing the Raw Daemon
Make sure the Raw Daemon service is running.
Open up the Results Management Page from the Protein Prospector home page. Select the Import option from the menu next to the Submit button.
Select the file T20100722-33_ITMSms2cid.zip using the Browse button.
Press the Submit button.
This will import a project to test the Daemon installation.
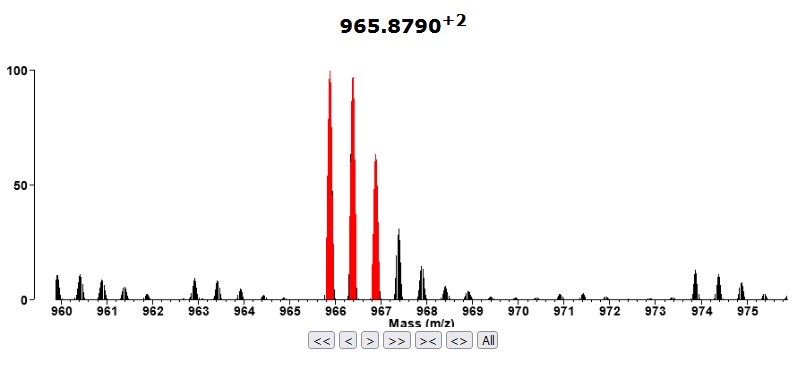
Go to Search Compare and select the newly imported project (T20100722-33_ITMSms2cid). Select a Report Type=Peptide report from the Search Compare form and bring up the report. The m/z column in the report should be coloured blue to signify that the project has raw data (a Thermo raw file). Click on one of the links in the m/z column. It should bring up a display like the one shown below which shows the MS precursor of the MSMS scan.
In LINUX, swap space can be created as a disk partition when installing the system or as a file within the file system.
Note when running the commands below some may need to be run as superuser or via sudo.
You can check if swap space on the system is enabled via the swapon command. Ie:
sudo swapon --show
A typical system with swap space as a disk partition is shown below.
NAME      TYPE      SIZE   USED PRIO
/dev/sda5 partition 975M 186.8M   -2
You can also use the free command to check the memory and swap space.
free -h
Example output:
              total        used        free      shared  buff/cache   available
Mem:           47Gi       1.8Gi       3.0Gi       470Mi        42Gi        44Gi
Swap:         974Mi       186Mi       788Mi
If you get no output them swap space is not enabled for your system.
You can view the partition table for the drive where the swap partition is installed via the fdisk command. In this case the drive is /dev/sda so enter the command:
sudo fdisk -l /dev/sda
In this case the output was:
Disk /dev/sda: 97.7 GiB, 104857600000 bytes, 204800000 sectors
Disk model: PERC 6/i
Units: sectors of 1 * 512 = 512 bytes
Sector size (logical/physical): 512 bytes / 512 bytes
I/O size (minimum/optimal): 512 bytes / 512 bytes
Disklabel type: dos
Disk identifier: 0x21fcd4b9

Device     Boot     Start       End   Sectors  Size Id Type
/dev/sda1  *         2048 202799103 202797056 96.7G 83 Linux
/dev/sda2       202801150 204797951   1996802  975M  5 Extended
/dev/sda5       202801152 204797951   1996800  975M 82 Linux swap / Solaris
The reason sda5 is used is that partitions 1 to 4 are primary partitions and those above 5 are logical partitions. If you want to use logical paritions one of the primary partitions, sda2 in this case, have to define a pointer. Here the Id is 5 and the Type is Extended.
dd if=/dev/zero of=/swap1 bs=1024 count=1000000
You should change the permissions of the file so only the root user has read/write access.
sudo chmod 600 /swap1
The following command converts the file into a file of swap type.
sudo mkswap /swap1
To activate the file use the command:
swapon /swap1
The swap file can be activated on reboot by editing the /etc/fstab file and adding a line for the swap file.
/swap1 swap swap defaults 0 0
If you have a file with a name such as '@w\S'$'\323''U' this can be difficult to delete using the standard rm command. One way of deleting it is via its inode. First list the file's inodes as follows:
ls -i
This will give an output such as:
131083 '@w\S'$'\323''U'
along with inodes for the other files in the directory. The inode is 131083.
You might want to inspect the file before deleting it. The following command will run the cat command on the file:
find -inum 131083 -exec cat {} \;
The inode can then be put in the following command to delete the file:
find . -maxdepth 1 -type f -inum 131083 -delete
Sticky bits are mostly used on directories. If the stick bit is set on a particular directory then only the user and root can rename files and directories within that directory. There are 2 ways of setting the sticky bit using chmod. Firstly you can use it as part of an octal permissions specifier thus (where the sticky bit is the leading 1):
chmod 1777 dir
Alternatively you can specify -t which will leave other permissions intact.
chmod 1777 dir
The t will show up as the last character in the permission. Eg:
drwxrwxrwt 2 www-data www-data 4096 2021-01-28 17:26 /home/username/dir
Debian versions have a version number and a codename, such as Debian 11 Bullseye. The code names come from the Toy Story movie series.
There are several methods to check the release you have:
cat /etc/os-release
cat /etc/issue
lsb_release -crid
hostnamectl
This method also gives the point release (eg 10.11 as distinct from 10).
cat /etc/debian_version
| Version | Code Name | Release Date | End of Life Date |
|---|---|---|---|
| 6.0 | Squeeze | 2011-02-06 | 2014-05-31 |
| 7 | Wheezy | 2013-05-04 | 2016-04-25 |
| 8 | Jessie | 2015-04-25 | 2018-06-17 |
| 9 | Stretch | 2017-06-17 | 2020-07-18 |
| 10 | Buster | 2019-07-06 | 2022-09-10 |
| 11 | Bullseye | 2022-09-10 | about 2024-07 |
The lsblk command lists information about all available block devices including unmounted ones. The output can also show the corresponding directory that has been mounted. Eg:
$ lsblk
NAME                    MAJ:MIN RM  SIZE RO TYPE MOUNTPOINT
sda                       8:0    0 97.7G  0 disk
↳sda1                    8:1    0 96.7G  0 part /
↳sda2                    8:2    0    1K  0 part
↳sda5                    8:5    0  975M  0 part [SWAP]
sdb                       8:16   0    9T  0 disk
↳sdb1                    8:17   0    9T  0 part
  ↳lhdata_vg-lhdata_lv 254:0    0  8.1T  0 lvm  /mnt
sr0                      11:0    1 1024M  0 rom
If the disk isn't mounted then a mount point won't be shown.
If a drive is unmounted it can be mounted from the command line. A couple of examples are shown below:
In the example below there's an unmounted 8.1TB partition.
$ lsblk
NAME                    MAJ:MIN RM  SIZE RO TYPE MOUNTPOINT
sda                       8:0    0 97.7G  0 disk
↳sda1                    8:1    0 96.7G  0 part /
↳sda2                    8:2    0    1K  0 part
↳sda5                    8:5    0  975M  0 part [SWAP]
sdb                       8:16   0    9T  0 disk
↳sdb1                    8:17   0    9T  0 part
  ↳lhdata_vg-lhdata_lv 254:0    0  8.1T  0 lvm
sr0                      11:0    1 1024M  0 rom
The command to mount it is:
sudo mount /dev/lhdata_vg/lhdata_lv /mnt
In the example below there's an unmounted 9.6TB partition.
NAME    MAJ:MIN RM   SIZE RO TYPE MOUNTPOINTS
loop0     7:0    0  61.9M  1 loop /snap/core20/1518
loop1     7:1    0  63.2M  1 loop /snap/core20/1623
loop2     7:2    0  79.9M  1 loop /snap/lxd/22923
loop3     7:3    0   103M  1 loop /snap/lxd/23541
loop4     7:4    0    48M  1 loop /snap/snapd/17029
loop5     7:5    0    48M  1 loop /snap/snapd/17336
vda     252:0    0   160G  0 disk
↳vda1  252:1    0 159.9G  0 part /
↳vda14 252:14   0     4M  0 part
↳vda15 252:15   0   106M  0 part /boot/efi
vdb     252:16   0   9.6T  0 disk
vdc     252:32   0   500G  0 disk
↳vdc1  252:33   0 499.9G  0 part
↳vdc14 252:46   0     4M  0 part
↳vdc15 252:47   0   106M  0 part
The command to mount it is:
sudo mount /dev/vdb1 /mnt
The first step is to find the name of the folder corresponding to the mount point that you want to auto-mount at boot. In the following discussion this is assumed to be /mnt.
Getting the drive to automount at boot is a matter of editing /etc/fstab and adding an entry for your drive. When doing this it is best to use the drive's UUID (universally unique identifier). These can be found in the directory /dev/disk/by-uuid. Run the following command:
ls -al /dev/disk/by-uuid
An example output is:
total 0
drwxr-xr-x 2 root root 100 Feb  9 00:41 .
drwxr-xr-x 8 root root 160 Feb  9 00:41 ..
lrwxrwxrwx 1 root root  10 Feb  9 00:41 0317e8bf-4229-4db6-bb35-760500412774 -> ../../dm-0
lrwxrwxrwx 1 root root  10 Feb  9 00:41 3a4af065-4b4c-4b83-a642-762ff0040d99 -> ../../sda1
lrwxrwxrwx 1 root root  10 Feb  9 00:41 700c46ec-72ca-43b6-a968-2e477845d76f -> ../../sda5
If we then look at the current contents of /etc/fstab (see below) we can see that only the top entry is unreferenced.
# /etc/fstab: static file system information.
#
# Use 'blkid' to print the universally unique identifier for a
# device; this may be used with UUID= as a more robust way to name devices
# that works even if disks are added and removed. See fstab(5).
#
# <file system> <mount point>   <type>  <options>       <dump>  <pass>
# / was on /dev/sda1 during installation
UUID=3a4af065-4b4c-4b83-a642-762ff0040d99 /               ext4    errors=remount-ro 0       1
# swap was on /dev/sda5 during installation
UUID=700c46ec-72ca-43b6-a968-2e477845d76f none            swap    sw              0       0
/dev/sr0        /media/cdrom0   udf,iso9660 user,noauto     0       0
The following entry can be added to the end of the /etc/fstab file for our drive.
# data drive
UUID=0317e8bf-4229-4db6-bb35-760500412774 /mnt   ext3    defaults        0       0
Before doing this it is necessary to find the file system type (ext3 in this case). One way of doing this is as followings:
sudo su
blkid
A sample output is:
/dev/sda1: UUID="3a4af065-4b4c-4b83-a642-762ff0040d99" TYPE="ext4" PARTUUID="21fcd4b9-01"
/dev/sda5: UUID="700c46ec-72ca-43b6-a968-2e477845d76f" TYPE="swap" PARTUUID="21fcd4b9-05"
/dev/sdb1: UUID="Y6Tbzm-f8bd-JPfn-O3Pd-yEK7-gBL1-zgYZZn" TYPE="LVM2_member" PARTLABEL="lh_data" PARTUUID="7f802e05-ceb1-49ef-8c1d-bccd0898429a"
/dev/mapper/lhdata_vg-lhdata_lv: LABEL="lhdata" UUID="0317e8bf-4229-4db6-bb35-760500412774" TYPE="ext3"
From this it can be seen that the file system type is ext3.
We should test the fstab file before rebooting as an incorrect fstab can render a disk unbootable. To test run:
sudo findmnt --verify
Any errors need to be addressed before rebooting.
The time since the last reboot can be displayed using the uptime command. Eg:
$ uptime
 16:03:38 up 66 days,  7:37,  2 users,  load average: 0.04, 0.05, 0.01
Another command that will also display previous reboots is the last command. Eg:
$ last reboot
reboot   system boot  5.15.0-52-generi Fri Oct 28 08:26   still running
reboot   system boot  5.15.0-52-generi Tue Oct 25 10:27 - 08:25 (2+21:58)
reboot   system boot  5.15.0-48-generi Thu Sep 22 16:30 - 10:27 (32+17:56)
reboot   system boot  5.15.0-47-generi Mon Sep 19 14:32 - 16:30 (3+01:58)
curl is a useful command for downloading very large files from ftp sites as the download can be resumed if the first download didn't complete.
The largest file to download to make the UniProtKB database is uniprot_trembl.fasta.gz. The curl command to download this file to the current directory is:
curl -p --insecure "ftp://ftp.ebi.ac.uk/pub/databases/uniprot/knowledgebase/uniprot_trembl.fasta.gz" -o "uniprot_trembl.fasta.gz"
If the command fails or you want to pause it to a later date you can resume the download with the command:
curl -p --insecure "ftp://ftp.ebi.ac.uk/pub/databases/uniprot/knowledgebase/uniprot_trembl.fasta.gz" -C - -o "uniprot_trembl.fasta.gz"
You might want to be able to edit the files in the params directory without logging into a server using say ssh. You could for example use WinSCP. If you don't want to access the server using an account with root/sudo permissions then you will first need to change permissions on the files. Generally the files will be owned by the www-data user and can only be edited by root or an account with sudo access. So ls -l would typical show this:
-rw-r--r-- 1 www-data www-data 15958 Sep 14 12:21 usermod_glyco.txt
To enable the file to be edited by a standard user enter the following commands. This assumes the params files are in /var/lib/prospector/web/params.
cd /var/lib/prospector/web/params
sudo chmod -R g+w *
sudo chmod -R a+w *
The -R means recursive so all subdirectories and files.
The g means group. So every user in the www-data group of users.
The a means all. So all users have write access to the files.
The * means do it for all files in the directory.
This changes the permissions to:
-rw-rw-rw- 1 www-data www-data 15958 Sep 14 12:21 usermod_glyco.txt
Remember that the files on a LINUX server's params directory are UNIX text files. These differ slightly from text files on a Windows computer. On WinSCP you would thus set the Transfer Settings to Text when uploading and downloading files.
These instructions are based on https://docs.oracle.com/en/cloud/cloud-at-customer/occ-get-started/add-ssh-enabled-user.html.
1. Generate an SSH key pair for the new user. Eg for an RSA key of length 2048 the command would be:
ssh-keygen -b 2048 -t rsa
The default path for the private key file could be something like /home/user_name/.ssh/id_rsa. Alternatively you can specify a path via the command prompt. You can optionally also enter a possibly optional passphrase.
The name of the public key file is the name of the private key file with .pub appended. Eg id_rsa.pub/
2. Copy the public key value to a text file. You'll use this key later in this procedure.
3. Login to the LINUX instance and become root via:
sudo su
4. Create a new user.
useradd new_user
5. Create a .ssh directory in the new user's home directory.
mkdir /home/new_user/.ssh
5. Create a .ssh directory in the new user's home directory.
6. Copy the SSH public key that you noted earlier to the /home/new_user/.ssh/authorized_keys file.
echo "key" > /home/new_user/.ssh/authorized_keys
Here, key is the SSH public key value from the key pair that you generated earlier, enclosed in double quotation marks.
7. Add the new user to the list of allowed users in the /etc/ssh/sshd_config file on your instance, by editing the AllowUsers parameter, as shown in the following example:
AllowUsers opc myadmin
In this example, the AllowUsers parameter already had the opc user. The myadmin user has now been added.
8. Change the owner and group of the /home/username/.ssh directory to the new user:
chown -R new_user:group /home/new_user/.ssh
9. Restart the SSH daemon on your instance.
/sbin/service sshd restart
10. To enable sudo privileges for the new user, edit the /etc/sudoers file by running the visudo command. In /etc/sudoers, look for a line similar to the following line:
%opc ALL=(ALL) NOPASSWD: ALL
Add the following line right after the preceding line:
%group_of_new_user ALL=(ALL) NOPASSWD: ALL
11. You can now log in as the new user:
ssh new_user@ip_address -i private_keyip_address is the public IP address of the instance.
private_key is the full path and name of the file that contains the private key corresponding to the public key that you added to the authorized_keys file earlier in this procedure.
When you type ls into a LINUX console to get a directory listing the files are sometimes shown in different colours.
The ls command uses the environment variable LS_COLORS to determine the colours filenames are displayed in. Eg:
# echo $LS_COLORS
rs=0:di=01;34:ln=01;36:mh=00:pi=40;33:so=01;35:do=01;35:bd=40;33;01:cd=40;33;01:or=40;31;01:mi=00:su=37;41:
sg=30;43:ca=30;41:tw=30;42:ow=34;42:st=37;44:ex=01;32:*.tar=01;31:*.tgz=01;31:*.arc=01;31:*.arj=01;31:
*.taz=01;31:*.lha=01;31:*.lz4=01;31:*.lzh=01;31:*.lzma=01;31:*.tlz=01;31:*.txz=01;31:*.tzo=01;31:*.t7z=01;31:
*.zip=01;31:*.z=01;31:*.dz=01;31:*.gz=01;31:*.lrz=01;31:*.lz=01;31:*.lzo=01;31:*.xz=01;31:*.zst=01;31:
*.tzst=01;31:*.bz2=01;31:*.bz=01;31:*.tbz=01;31:*.tbz2=01;31:*.tz=01;31:*.deb=01;31:*.rpm=01;31:*.jar=01;31:
*.war=01;31:*.ear=01;31:*.sar=01;31:*.rar=01;31:*.alz=01;31:*.ace=01;31:*.zoo=01;31:*.cpio=01;31:*.7z=01;31:
*.rz=01;31:*.cab=01;31:*.wim=01;31:*.swm=01;31:*.dwm=01;31:*.esd=01;31:*.jpg=01;35:*.jpeg=01;35:*.mjpg=01;35:
*.mjpeg=01;35:*.gif=01;35:*.bmp=01;35:*.pbm=01;35:*.pgm=01;35:*.ppm=01;35:*.tga=01;35:*.xbm=01;35:*.xpm=01;35:
*.tif=01;35:*.tiff=01;35:*.png=01;35:*.svg=01;35:*.svgz=01;35:*.mng=01;35:*.pcx=01;35:*.mov=01;35:*.mpg=01;35:
*.mpeg=01;35:*.m2v=01;35:*.mkv=01;35:*.webm=01;35:*.ogm=01;35:*.mp4=01;35:*.m4v=01;35:*.mp4v=01;35:
*.vob=01;35:*.qt=01;35:*.nuv=01;35:*.wmv=01;35:*.asf=01;35:*.rm=01;35:*.rmvb=01;35:*.flc=01;35:*.avi=01;35:
*.fli=01;35:*.flv=01;35:*.gl=01;35:*.dl=01;35:*.xcf=01;35:*.xwd=01;35:*.yuv=01;35:*.cgm=01;35:*.emf=01;35:
*.ogv=01;35:*.ogx=01;35:*.aac=00;36:*.au=00;36:*.flac=00;36:*.m4a=00;36:*.mid=00;36:*.midi=00;36:
*.mka=00;36:*.mp3=00;36:*.mpc=00;36:*.ogg=00;36:*.ra=00;36:*.wav=00;36:*.oga=00;36:*.opus=00;36:*.spx=00;36:
*.xspf=00;36:
LS_COLORS are key value pairs separated by colons. The keys are pre-defined and are shown in the table below.
| bd | block device |
| ca | file with capability |
| cd | character device |
| di | directory |
| do | door |
| ex | executable file |
| fi | regular file |
| ln | symbolic link |
| mh | multi-hardlink |
| mi | missing file |
| no | normal non-filename text |
| or | orphan symlink |
| ow | other-writable directory |
| pi | named pipe, AKA FIFO |
| rs | reset to no color |
| sg | set-group-ID |
| so | socket |
| st | sticky directory |
| su | set-user-ID |
| tw | sticky and other-writable directory |
| *.??? | specific file types indicated by suffix |
The colour values can be changed. The values consist of up to 3 parts separated by semicolons. Each part may be omitted and the parts can be in any order.
The colours are a subset of the standardized ASCII escape sequences. One of the parts specifies the text style:
| 00 | none |
| 01 | bold |
| 04 | underscore |
| 05 | blink (flashing text) |
| 06 | reversed or invert (swapping the foreground and background colours) |
| 07 | concealed or hidden |
Another part specifies the colour.
| 30 | black |
| 31 | red |
| 32 | green |
| 33 | yellow |
| 34 | blue |
| 35 | magenta |
| 36 | cyan |
| 37 | white |
The other part specifies the background colour.
| 40 | black background |
| 41 | red background |
| 42 | green background |
| 43 | yellow background |
| 44 | blue background |
| 45 | magenta background |
| 46 | cyan background |
| 47 | white background |
Eg di=01;34 is the entry for directories, ie bold blue.
It is possible to use the script below (from this link) to show the colours for your current terminal.
#!/bin/bash
# For each entry in LS_COLORS, print the type, and description if available,
# in the relevant color.
# If two adjacent colors are the same, keep them on one line.

declare -A descriptions=(
    [bd]="block device"
    [ca]="file with capability"
    [cd]="character device"
    [di]="directory"
    [do]="door"
    [ex]="executable file"
    [fi]="regular file"
    [ln]="symbolic link"
    [mh]="multi-hardlink"
    [mi]="missing file"
    [no]="normal non-filename text"
    [or]="orphan symlink"
    [ow]="other-writable directory"
    [pi]="named pipe, AKA FIFO"
    [rs]="reset to no color"
    [sg]="set-group-ID"
    [so]="socket"
    [st]="sticky directory"
    [su]="set-user-ID"
    [tw]="sticky and other-writable directory"
)

IFS=:
for ls_color in $LS_COLORS; do
    color="${ls_color#*=}"
    type="${ls_color%=*}"

    # Add description for named types.
    desc="${descriptions[$type]}"

    # Separate each color with a newline.
    if [[ $color_prev ]] && [[ $color != "$color_prev" ]]; then
        echo
    fi

    printf "\e[%sm%s%s\e[m " "$color" "$type" "${desc:+ ($desc)}"

    # For next loop
    color_prev="$color"
done
echo
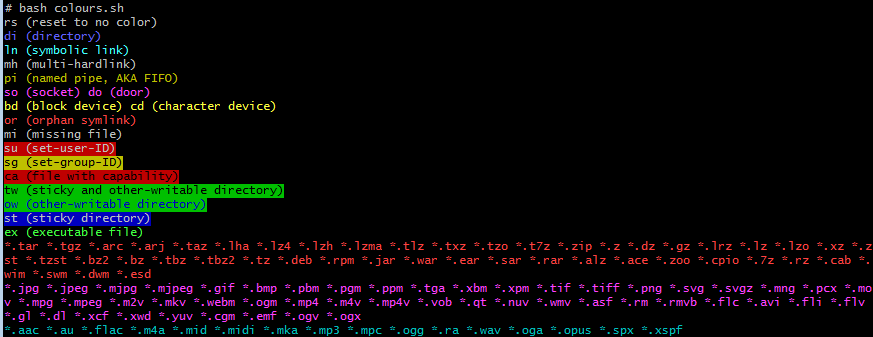
Running this with the default Ubuntu 22 colours shown at the start of this section gives.
systemd is a service manager that was developed to replace the older System V init.d scripts. The previously used init.d scripts mostly do similar things such as start, stop, status, restart, etc. systemd attempts to capture the common use cases and provide a standardized configuration. It starts system services in parallel to remove unnecessary delays. It uses Unit Dependencies to define whether a service wants/required other services to run successfully, and Unit Order to define whether a service needs other servics to be started before/after it.
To create a service, you will need to write a .service file in the /etc/systemd/system directory. For example for a service called myService you would write a file /etc/systemd/system/myService.service that looks something like this:
[Unit]
Description=Some Description
Requires=syslog.target
After=syslog.target

[Service]
ExecStart=/usr/sbin/<command-to-start>
ExecStop=/usr/sbin/<command-to-stop>

[Install]
WantedBy=multi-user.target
Once you have your service file you must first reload the systemd configuration via the following command:
sudo systemctl daemon-reload
You can then start, stop and restart your service using the systemctl command.
sudo systemctl start myService
sudo systemctl stop myService
sudo systemctl restart myService
The following commands will start the service when booting the server:
sudo systemctl enable myService
You can disable starting the service when booting the server via the command:
sudo systemctl disable myService
If the results file is called 0kN8jh6e7aPxRxQa.xml a suitable command would be:
grep -A 1 '<d>' --no-group-separator 0kN8jh6e7aPxRxQa.xml | grep -v '<d>' | more
-A 1 prints one extra line of trailing context after each lines containing <d>. It places a line containing a group separator (--) between contiguous groups of matches.
--no-group-separator supresses the group separator.
grep -v '<d>' removes the line containing the <d> match.
An example output is shown below:
1-15.401-1-1-1173       34      348.6815        2       0
1-8.056-1-1-561 37      354.1736        2       0
1-15.436-1-1-1176       33      356.6786        2       0
1-9.830-1-1-687 25      358.2094        2       0
1-9.771-1-1-681 33      367.2126        2       0
1-15.396-1-1-1172       32      367.6561        2       0
1-15.908-1-1-1225       35      367.7134        2       0
1-9.865-1-1-690 31      383.2084        2       0
1-15.063-1-1-1139       38      386.2169        2       0
1-9.331-1-1-649 37      403.2114        2       0
1-16.016-1-1-1237       40      409.6433        2       0
1-9.643-1-1-671 39      409.7150        2       0
The command:
ssh -J user1@server1.ucsf.edu user2@server2
logs into user2 at server2 via user1 at server1. Here server1 is called a jump server.
You will be prompted for the passwords for user1 and user2.
The command:
scp -J user1@server1.ucsf.edu file1.txt user2@server2:/home/user2
copies the file file1.txt into the home directory of user2 on server2 via user1 at server1. Here server1 is called a jump server.
You will be prompted for the passwords for user1 and user2.